Showing posts with label wardrobe planning. Show all posts

Wednesday, July 17, 2019

First Pair of Shorts in Decade

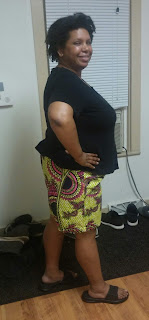
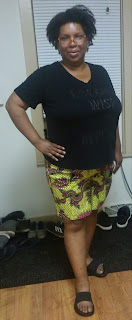
 Over the first week of July I completed my first pair of shorts for myself in well over a decade.  I'm not sure why for the last ten years I felt my body type could not wear shorts. So using my limited space and supplies well staying at my son's I decided I needed a project to help break out of my comfort zone.
Using a planning sheet from mybodymodel's Project Planner it was time to re-sketch my pattern of choices mimicking the print in the fabric. 


The Details

Pattern: Lutterloh supplement 273-34-2009. These are a mid-rise knee length short. I'm 5'3" so they might not be knee length on you.
Size: Hip measurement of 128cm. Altered to make them me sized.

Supplies: Fabric, Thread, 4 buttons
Fabric Requirements: I used about 3 yards of African Wax Print. I used this much fabric due to the print. 


Fabric: The Fabric was purchased from Affordable African Prints, which is a group on Facebook. This is a 100% Cotton Ankara Fabric in a green, pink and black print. I would consider it a boarder print as well because the pattern near the bottom selvage was much more condensed than by the top selvage.


Alterations: Need to enlarge the waist by 26cm plus ease. Using the slide and pivot method I added 7.2cm per side. 
Need to also enlarge the hip by 2cm plus ease. Using the same slide and Pivot method I added 1.8cm per side


Modifications: This pattern calls for a zipper fly. I instead decided to make a covered button fly.  
Only one problem with this was I did not have my button hole foot with me to allow my machine to make one step button holes. So did them using zig zag stitch and tacking. 

Thank you to the following tutorials for helping with this process. I did make slight adjustments to their methods but these were very helpful in figuring it out.


Changes for Next Time
This pattern went together very easily and created a well fitted pattern. I plan to make these shorts again since they have been a very nice way too beat the hit this summer. In the next pair I will be scooping out the back crotch just slightly and raising the center back maybe  a little. When I first wore them I felt like the mid-rise of these shorts was to low and exposed my under garments in the back a little. What I really think is going on is the crotch might be slightly to short causing some tightness on the bum. Over all I really love these shorts and they could fast become a nice new staple to the summer wardrobe.

Until next time
Live You
Live Now
Live Bold

Tuesday, July 2, 2019

Starting Fresh

Today is the day to start blogging again. The sewing adventure never stopped. So lets fast forward to summer 2019 and continue the story.

 Currently I am working on a pair of shorts when done they will be made out of  a wonderful Ankara fabric purchased back in 2018 from the Facebook group Affordable African Fabrics. Like every good tale I started with a plan. Let take a quick look at mine.

Before deciding on any patterns this summer I wanted to make sure they would look fabulous on my body type. Using my custom 
mybodymodel 
croquis, and circled by my Lutterloh pattern stash I sat down for days making quick fun sketches in my project planner. In no way are they professional fashion drawing. These simple quick drawings became my fashion idea color book that provided a wonderful chance to try styles I would not normally choose straight away. I drew for days and at the end I had 4 pages of project start points.

One of the best parts of using  mybodymodel as your croquis is that each model is made with your body measurements. This helps you get a truer idea of how something might look in it finished form. Granted a 2D image is never going to be the exact duplicate as your body.


Not sure what a croquis is... Its a French word for sketch. Most often it is a quick sketch of a model done in a few minutes time. The model might change poses several times enabling an artist to have several sketches. In the fashion world it can be used as a quick drawing to see how a style might look. Often these fashion illustrations are not connected to a real persons body measurements.


The pattern I've chosen to use is from my original Lutterloh kit from 2011, pattern number 34 or if you don't have that kit it would be Lutterloh supplement 273-34-2009. 
Lutterloh 273-34-2009


Not sure what Lutterloh is... Lutterloh is a system that uses miniature patterns and a special tape measure to draft up your patterns. You can learn more about the Lutterloh system here.


Lets hope these shorts turn out the way as envisioned. Until next time.
Live you
Live now
Live bold

Monday, July 14, 2014

Laid back and cool like the 70"s


Today I pulled out some wonderful bright bamboo rayon knit. This knit kept screaming old 70's black movies at me. Yeah, you know the kind that Pam Greer would star in wearing those wonderful jumpsuits and flawy dress in. So I took a stab at a two piece sundress. flowy and loss sexy cool.


Yeah it did not turn out exactly as I thought. But I do like the two pieces. The skirt is a self draft. I basically cut the fabric the length I wanted it and used elastic to gather in the waist to my waist measurement. It's not hemmed here and even after I cut off four more inches I decided not to hem it. At least not today.

The stripe top is Lutterloh 293-88-2014. I had a few little problems or questions with this pattern.

1. How to best stabilize the neck edges. I had a sewing friend suggest just stabilizing the back which I did do. I also stabilized the shoulder seams. I think next round I may try to do something with the front. I felt like the bamboo rayon knit could have used a little support.

2. How to best secure the front crossover so it does not droop?

3. make sure next round with this top to hem before basting cross over to other side front. Really once you sew the side seams you can't really hem it. So my version is not hemmed.

Over all I lied this top pattern and will do it again in a solid color.
Here is the top Lutterloh 293-88-2014 matched up with my black and pink piping skirt Lutterloh 281-144-2011.


Lastly the striped 70's inspired skirt with an Old Navy pink t-shirt.

I don't know what tomorrows adventure will be. Not hearing any of my fabric calling out to be next.

Oh well. Happy sewing.

Sunday, June 15, 2014

My Church Flow Skirt.

This week was one of those weeks were I was testing my pattern making skills for a few tops (bodice). I will share those shortly after I work out a few kinks. Love learning pattern-making. Found myself really shooting for a super fun outfit for Fathers Day Church service. Well that certainly called for a new skirt first. Here it is. A super simple 3 piece skirt using your body measurements. I followed the basic ideas form this maxi skirt tutorial . My additions included inseam pockets and two 11/2 X2 inches pieces off elastic add to each side of my waistband above the hip hopping it would snug in the knit waist band a bit. Next skirt I will be reworking the waistband since the 4 way stretch knit is having a work out keeping the skirt up and keeping it's shape. I also need up shorting the skirt 5 inches from my original measurements. Not sure if son took my length wrong or is I some how miss measured the fabric. Love, love this skirt and will be making more. Fabric is a simple cotton quilting fabric picked up at Walmart. Happy sewing!


Sunday, May 18, 2014

And Then There Was An A-line Skirt


Once upon a time a sheet was hanging at a thrift store. That sheet did not know what it's purpose was any longer since it's partner was no longer around. In came a bright determined sewer who looked at that sheet and saw a skirt. Took a few dollars to to buy the sheet. She then brought it home and cared for its needs with a good hot washing and drying. Gently fold that sheet and placed it promptly in the sewing corner of the kitchen.
For weeks the dressmaker tried to figure out what to do with the sheet. Drawing pictures and looking through patterns to find just the perfect garment or two.
One cold and dreary spring.... Are we sure it was not still winter? No, spring weekend the sewist dreaming to become a designer decided to watch the Patternmaking Basics: The Shirt Slopper offered on Craftsy.  New inspiration began fluttering and and singing in her brain. Although this would be designer had a perfectly good skirt block made from her Surefit Designs Dress Kit she thought it would be great fun to see how she could change that pencil skirt (straight) into some thing new.
When it came time to work with the fabric she released she could not separate the sheet from her new friend, some pink broadcloth, and decide the broadcloth would be the perfect lining.  Other decisions went into the plan and inspiration began dancing in her head. The skirt no longer would be a straight skirt but and a-line for summer with in seam pockets.  So at last the day came and the button was sewn on. The happy seamstress looked at the creation and said yes this is good. Smiling as the sheet now skirt fluttered in the wind with all it's glory.

The magic of dart manipulation and adding volume. I've been reading about it in several books including  Patternmaking of Fashion Designers, and Make Your Own Dress Pattern. It was just the right time to take a new step. One of the things I have learned is that having several well fitting basic patterns is all you need to start designing more for yourself. A rather good wardrobe can be at your finger tips.  I will be sewing this skirt again. After a few more minor adjustments  I commit it to card stock like my initial pencil skirt I made earlier this year. I'm not sure what's up next on my sewing table but several Lutterloh tops have been calling. Happy sewing!


Update: My daughter tried on my skirt and it fit her perfectly. I decided to give it to her as one of her Mary Kay outfits. Here she is styling it.


Wednesday, March 5, 2014

Nothing Wrong With a Little Curve

With my newest sewing adventure I was playing with the idea of curves. I read that woman with an O or rectangle shape meed to find the way to give the illusion of a shape. Nothing sleeks of feminine curves like the appearance of hips and a small waist. On a plus sizes body the illusion of being fit may be hard but seams going in the correct place may help. This wonderful Lutterloh pattern seemed to be made to help with both of these goals. This six paneled side zipped tulip skirt is one hot number for work or play. I made mine up in denim for a comfy weekend look.


Pattern: 
Lutterloh 274-139-2009 (supplement-pattern-year) 
Pattern Description: 
This is a basic 6 panel skirt with tulip hem.
Pattern Sizing:
Lutterloh is based on your bust and hip measurement. Your pattern is drafted out using these two measurements. So ideally if your bust and hip are 50cm to 140cm the system should work for you. 
Did it look like the photo/drawing on the pattern envelope once you were done sewing with it?.
Yes
Were the instructions easy to follow?
Lutterloh has no instructions. Using A Guide to Fashion Sewing by Connie Amaden-Crawford I was able to create very nice flat-felt seams making my inside look nearly as nice as the out side. Two side seams were ironed flat and serge finished so I was able to put in a side zipper.
What did you particularly like or dislike about the pattern?
I liked that this pattern because the silhouette gives a wonderful curvy illusion that is very feminine. 
Fabric Used:
Dark denim with a slight stretch that was in my stash. This fabric was a goodwill find.
Pattern alterations or any design changes you made:
The size I traced this out in gave me a waist that was 14 cm smaller than what I needed. I wanted the skirt to fit me snug so I added 1 cm to each seam at the waist and blended back into the hip. This should have fit me snug as that is still 2 cm smaller than I need but it some how was a bit big. Thankfully I do not feel the need to pull it up every 5 minutes like have with some store bought ones lately.
Would you sew it again? Would you recommend it to others?
Yes to both questions. I have a friend that has asked me to create this skirt for her.
Conclusion: 

This is a nice basic skirt making it a great choices to build the basics in my wardrobe.

Saturday, February 8, 2014

I'm back and off to a skirting start

Wow it feels good to be back checking all my blogger friends projects and reading about new sewing ideas. I had no Idea I had missed so much.  In fall I decided to take at least this year off of my education endeavors and enjoy a little bit of relaxed learning. It did not take long to realize most of the shows I am drawn to on the tv are creative minded and when I started hanging out online at Sure Fit Designs Learning Center, Pattern Review, Esty and many others it became quiet obvious I need to make the trek to the storage areas and get out my sewing books and fabric. Ok several pieces of fabric came out.

Think spring should be the key word around here. Geez with the outside temperature colder than in the arctic and the endless feeling of being trapped inside why not a little thought of fun spring skirts? Some how my brain says that does not computer and here in the first of my skirt sew off skirts is Lutterloh 262-246-2011 (supplement-pattern-year) from my kit.


Pattern: 
Lutterloh 282-246-2011 (supplement-pattern-year) 
Pattern Description: 
This is a basic dart less skirt with two side slits. In their picture the slights are embellished with button holes and buttons.
Pattern Sizing:
Lutterloh is based on your bust and hip measurement. Your pattern is drafted out using these two measurements. So ideally if your bust and hip are 50cm to 140cm the system should work for you. 
Did it look like the photo/drawing on the pattern envelope once you were done sewing with it?.
Yes here is the link to the drawing.
Were the instructions easy to follow?
Lutterloh has no instructions. I checked my Easy Guide to Sewing book a couple times to make sure I was attaching the zipper and waistband by a good method.
What did you particularly like or dislike about the pattern?
I liked that this pattern was a simple skirt but not your ordinary work appropriate business pencil skirt. The pattern hugs in at the waist and gives plenty of room in the hips.
Fabric Used:
Dark charcoal corduroy that was in my stash. It may have come originally from fabric.com or Hancock’s
Pattern alterations or any design changes you made:
The size I traced this out in gave me a waist that was 11 cm smaller than what I needed. I wanted the skirt to fit me snug so I added 2.5cm to the side seams at the waist and blended back into the hip. This is the first skirt I have made in years that I did not add elastic to the waist. SurprisingLy I still have plenty of room in the waist area, but I do not feel the need to pull it up every 5 minutes like have with some store bought ones lately.
Would you sew it again? Would you recommend it to others?
Yes to both questions. I think a denim one is working it’s way in my mind.
Conclusion:
This is a nice basic skirt. That makes it a great choice to build the basics in my wardrobe.

On a side note looking at my shelf in these photos and some fitting issues I have had lately I am wondering what shape I have. Any one have any ideas?

Off to figure out what is next. Have a sewtastic day!

Sunday, July 3, 2011

Me Made June the Final Days

The challenge is finally done. What I learned from Me made June  is that I have a few garments that I grab over and over and over again and that I also have some holes in my wardrobe. The goal is to slowly build my wardrobe up so that 90% of the clothes I have are me made. Also creating mini wardrobes of 6 or more pieces in the same color story seems to work well when putting outfits together.  On to the outfits.

Day 20 Sweater: Thrifted, Top: Lutterloh Special Edition 31 #6, Pants: Macy's Jeans.
Day 21 Top: Lutterloh Supplement 279 #203, Pants: Lutterloh Project Jeans, Fuller Figure #137 copyright 1996.
Day 22 Hoddie: Macy's, Top: McCalls 5977, Pants: Macy's Jeans.
Day 23 Sweater: Kohls, Top: BurdaStyle Magazine 02-2009-118, The cutie on my arm is my great nephew.
Day 24 Some days you just feel like lounging. Today's lounge wear is vintage Lutterloh from the 1970 book  #416 copyright 1969.
Day 25 Sweater: Thrifted, Top: Top: Lutterloh Special Edition 31 #6, Pants: Simplicity 5074.
Day 26 Top: Lutterloh Special Edition 31 #6, Skirt: Lutterloh Supplement 281 #143.
Day 27 Top: Lutterloh Supplement 271 #45, Cami: Lane Bryant
Day 28 Gray Top: Thrifted, Green Top Butterick 5100
Day 29 Top: Lane Bryant, Pants: Lutterloh Project Jeans, Fuller Figure #137 copyright 1996. Correction the Pants are actually BurdaStyle 04-2009-134.

Day 30 Hoodie: Macy's, Top: Lutterloh Special Edition 31 #6, Skirt: Burda Plus Fashion Spring/Summer 2008 (E985) 405.

I'm currently working on what my kids have named the wonder bread top.  Happy sewing until next time.

Tuesday, June 21, 2011

A Few New Pieces.

So what do you do when summer cant decide to come? It"s mid June and it seems like mother nature is going through PMS or something. One day it's 90F and hot Hot HOT and the next day it's a rainy 60F and everyone is pulling out long pants and hoodies. 


For me that has put a hold on real summer sewing and instead I've been focusing on pieces that can be layered for easy of wear year around. Two of my Lutterloh patterns have become favorites. The first is Lutterloh Special Edition 31 #6. I've made this sleeveless darted pattern 3 times, and one of those times was as a dress. It still needs a little armhole work before I will totally call it a TNT but it's close. The second piece is Lutterloh 281 #145. This skirt I did in a fun denim.


 Pattern: 
Lutterloh Special Edition 31 # 6
Pattern Description:
This is a Fuller Figure pattern for a darted sleeveless knit top. A great alternative to summer tank tops or dress it up to replace a cami.
Pattern Sizing:
Lutterloh is based on your bust and hip measurement. Your pattern is drafted out using these two measurements. So ideally if your bust and hip are 50cm to 140cm the system should work for you. 
Did it look like the photo/drawing on the pattern envelope once you were done sewing with it?
I’ve made this 3 times. Both tops look like the line drawing. My dress version looks a little different.
Were the instructions easy to follow?
Lutterloh has no instructions. If you have basic sewing knowledge and have put a simple knit top together you should be fine.
What did you particularly like or dislike about the pattern?
I love that this top is simple yet the look of it changes depending on what type of fabric you use. It can be worn as a layering pieces but has enough shape to be warn alone.
What I didn’t like was that the arm holes are not snug enough. On my white version I did not stay stitch the neck and arm openings before binding and they stretched horrible.
Fabric Used:
For the multi color top a cotton blend knit from Fabric.com
For the white top cotton blend single knit from Hancock.
For  the strip dress a poly/rayon I believe came from Hancock.
Pattern alterations or any design changes you made:
On all three tops I experimented with making a binding per Easy Guide to Sewing instead of the facing piece Lutterloh suggests. I was working on a more t-shirt look. Also on all three I did a ½ inch narrow shoulder adjustment.
On the dress I added 19 inches to the length, rounded out the hips slightly and tapered the hem in by a ½ inch.
Would you sew it again? Would you recommend it to others?
Yes I will be sewing this again. Yes I would recommend this to other.
Conclusion:
This would be a great basic to add to any wardrobe. It can be dressed up or down depending on the fabric used.
Pattern: 
Lutterloh Supplement 281 # 144 or 145
Pattern Description: 
Easy fit a-line pull on skirt with two lengths and front pockets.
Pattern Sizing:
Lutterloh is based on your bust and hip measurement. Your pattern is drafted out using these two measurements. So ideally if your bust and hip are 50cm to 140cm the system should work for you. 
Did it look like the photo/drawing on the pattern envelope once you were done sewing with it?
Yes
Were the instructions easy to follow?
Lutterloh has no instructions.
What did you particularly like or dislike about the pattern?
This is a basic skirt. It could be a wardrobe styple depending on what fabric you made it in or how you dressed it up. It gave me a chance to practice top stitching and creating clean finished pocket bags using the French seam technique I learned from the Lutterloh New Zealand Jean Design class.
At the moment maybe the pockets. I believe they are cut a little too deep. I used some jean making techniques to create them so the bags would be made from a cotton lining. I found when I finished the skirt I had to do a little tacking on outer edges of pocket to have functioning pockets with out the lining peaking through.
Fabric Used:
Light weight black denim with slight stretch rescued from Goodwill. The pocket bags are made from a butterfly quilters cotton given to me from my mom’s friend.
Pattern alterations or any design changes you made:
Slightly tacked the corners of the pockets by sewing on top stitch line about ½ inch at top and side of pockets. I also used jean technique of using lining fabric for pocket bags and clean finishing them with French seams.
Would you sew it again? Would you recommend it to others?
Yes I will be making this again. Yes it is a good basic skirt.
Conclusion: 
This a great basic skirt that can be dressed up or down. Wonderful way to ad diversity to your summer wardrobe. For me I’ll be using it in place of always wearing crop pants.

Sunday, June 19, 2011

Me Made June day 12 to 19

Me made June is half over and this has been a fun experiment to see just how many of my me made creations I wear. It has also brought to light some holes in my wardrobe and at least one wardrobe malfunction or hum I wonder if I did this moment. Starting at the upper left rotating clock wise this is what I wore for my casual summer school work week. Bare with me my lovely teenage photographers are having a hard time shoting more than one shot to choose from.

Day 12 Top: Lane Bryant, Pants: Lutterloh 272 #201.
Day 13 Top: BurdaStyle Magazine 7-2008-118, Pants: Lane Bryant dress pants.
Day 14 Top: Lane Bryant, Pants: Burda Plus Fashion 2-2009-410
Day 15 Top: Lane Bryant, Pants: Lutterloh Jean Project Jeans 1996 #137
Day 16 Cami: Lane Bryant, Hoddie: Macy's, Pants: Simplicity 4375 Khaliah Ali


Again starting at upper left going clockwise.
Day 17 Sweater: Willow Bay, Top: Lane Bryant, Pants: Lutterloh Jean Project Jeans 1996 #137
Day 18 Top: Burda Plus Fashion 02-2010-410, Skirt: BurdaStyle Magazine 03-2010-136 made up in orange double knit with no zipper. Instead I put a 11/2 inch wide elastic at waist.
Day 19 Preview of  dress made with Lutterloh Classic Collection 3 Special Edition No. 31 #6 top. A review to this is forthcoming.

Until next time Happy Sewing.

Saturday, June 11, 2011

Day 11 and the Jean Adventure.

And after 3 weeks the jean making adventure has come to and end with the production on my wearable muslin. I will be making more pairs in the future but for know a few short gratification products are in store.

This adventure start back here when I announced I would be to take the Jeans Design Project offered by Lutterloh New Zealand. It's a wonderful class and I would recommended it to anyone. Sonja directions and helpful hints made it very enjoyable to try throwing around five pounds of denim on my sewing table as it was being molded into a pair of jeans.

After cutting out my denim and creating the front pockets it felt like half of the work was done. what a good feeling. The front stay and the zipper made the front look put together.

The yoke on the back of this denim is cut deep. It som how works very nice with the deeper crotch found in the Lutterloh fuller figured patterns.

once the yoke was created we sewed the inner leg seam. and the crotch. The order worked but make it ard when it was time to do the double top stitching on the outer leg. If you have any ideas to make this easier let me know. My double needle did not like the denim this thick and I ended up using my edger foot to do all my top stitching.
Once I basted the side seams I fit them on me again and again.  and again. until I felt that the looked ok. On problem I had was no matter how often I took in my waist band it seemed to keep growing. Also under the bottom I keep getting the line of fabric. Wondering if a flat but alteration would fix that.


After all this fitting was done it was a lot of fun deciding where oh where to place he back pockets and add all the finishing touches one it was all sewn up.

Over all I am happy with the final result and consider them a good working muslin.
Day 11 Lutterloh Jean Project jeans and Lutterloh Supplement 279 #203
 Pattern: 
The Pattern is the master provided by Lutterloh New Zealand’s Jeans Designing Project or Class. It is the full figured pattern #137 with a copyright of 1996

Pattern Description: 
This is a simple 5 pocket denim jean pattern made with a relaxed leg.

Pattern Sizing:
Lutterloh is based on your bust and hip measurement. Your pattern is drafted out using these two measurements. So ideally if your bust and hip are 50cm to 140cm the system should work for you. A side not the Fuller Figure provides extra depth in the crotch.   
         
Did it look like the photo/drawing on the pattern envelope once you were done sewing with it?
Yes but mine were longer and had a few changes.

Were the instructions easy to follow?
Lutterloh has no instructions. But Sonja from Lutterloh New Zealand’s direction from the Jean making course are excellent. Only found one area about attaching the waist band that is not clear. Her directions use words as well as diagrams to help you along. Also I used the zipper directions found at Threads.

What did you particularly like or dislike about the pattern?
I like that I could make these pants the way that I wanted too. The crotch depth is nice to don’t feel like I’m getting a wedgy or caring a wad of extra fabric. Mostly the relaxed fit was a pleasant surprise compared to the second skin look that seems a must because of the spandex in the denim.
Dislikes that I made the waist too big and still need to do some minor tweaking on the pattern. The yoke on this pattern also sits kind of low. I don’t really minded it but may try a pair in the future with this adjusted.

Fabric Used:
This was a dark denim that I rescued from Goodwill a few months back. It has a slight stretch to it that I didn't notice until I started this project.

Pattern alterations or any design changes you made:
Adjusted the waist by 4.25 cm. Ended up taking most of that out of it by making 1 inch seems. Pants still could have had a smaller waist. I also had to cut a new waist band almost 10 cm bigger because I think through all the playing with the fabric it grew. Created my waist band to be thin by only cutting out one strip and folding it in half. Made my belt loops thick. Per Sonya directions created a front stay. The front stay would be a great way to create a tummy slimmer. I made my back pockets very plan. Left off the rivets on this pair.

Would you sew it again? Would you recommend it to others?
This was a good pattern. I will be sewing it again and again as I want to fine tune and do some design changes. If you take the class good for beginners otherwise you need some knowledge of sewing this is not a easy project and takes some time.

Conclusion: 
Great little jean pattern that can become a tnt after a little more fine tuning.